If you have reached this article, it’s because the digital workflow in dentistry is already part of your plans. You have probably already watched several videos, spoken with industry brands, and still don’t have clarity about what you really need to purchase to get started.
After all, what are the stages of the digital workflow in dentistry? What best fits your clinical, technical, and financial reality?
My goal with this content is to present you with a simplified guide that will help you make more accurate decisions when looking for the ideal equipment for your clinical, technical, and financial reality.
We will divide this article into four stages to make it easier for you to understand the phases of the digital workflow:
- What a complete digital workflow includes and the function of each piece of equipment;
- What the reduced digital workflow options are for different profiles;
- What questions you should ask at the time of purchase.
What does a complete digital workflow include?
First of all, let’s put things into context:
In this article, we will not discuss the application of the digital workflow in the clinic or in the laboratory. The focus is exclusively on the equipment needed to enable a complete digital workflow in dentistry.
We will consider a set of technologies that allows you to carry out, virtually, the widest possible variety of cases. We are talking about a workflow capable of meeting demands such as: model fabrication, surgical guides, bruxism splints, provisionals, PMMA, zirconia, disilicate, and metal frameworks (focusing on chrome-cobalt and titanium), going beyond single crowns.
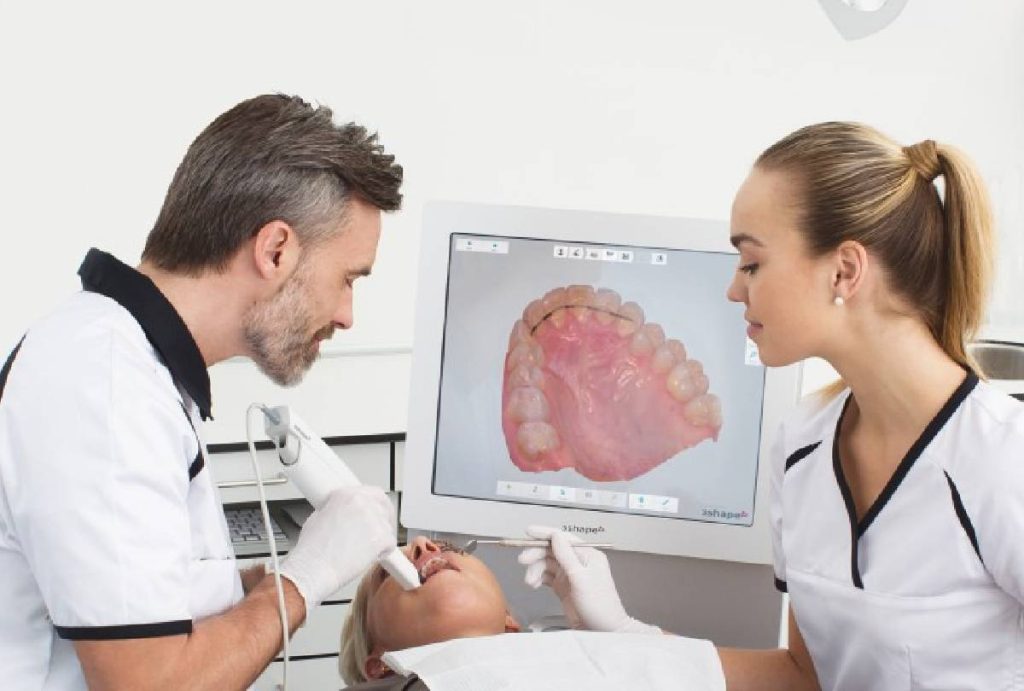
As with all workflow options we will discuss throughout this guide, everything starts with scanning — whether intraoral or from plaster models. This is where the first equipment purchase occurs at the start of your digital journey.
Types of scanners used at the beginning of the workflow
- Intraoral scanner: Used when the goal is to start the workflow digitally right from the direct scan of the patient’s mouth, still in the clinic.
- Desktop (or laboratory) scanner: Recommended when you want to digitize plaster models, converting them into digital files.
In addition to these, other devices can be used even in the “impression-taking” stage:
- Photogrammetry equipment: Especially useful for edentulous patients indicated for full-arch implant-supported restorations (Full Arches, AOX, Protocol, etc.). This device provides greater accuracy in identifying the position of implants.
- Facial scanner: Adds anatomical facial information to assist and optimize dental planning in aesthetic cases.
The scanning result is a 3D model of the patient’s mouth, the well-known .stl file, which is equivalent to the plaster model in the traditional workflow.
CAD software: the digital design stage
Next, we move on to what would be the “wax-up” in the analog process.
Here, aspects such as shape, anatomy, occlusion, and adjustments are defined. This process is carried out using CAD (Computer Assisted Design) software, also called digital design or digital wax-up.
This allows the digital design of structures such as teeth, full-arch restorations, splints, and others. The result will also be an .stl file, but now of the designed case.
CAM software: preparation for production
With the final file in hand, it’s time to choose the production strategy: 3D printing or milling?
We will detail the differences between these two technologies in the next section, but regardless of the choice, a CAM (Computer Assisted Manufacturing) software will be required.
It converts the .stl file into a format that the printer or milling machine can interpret and execute.
Printing or milling? Understanding the two production technologies
Now that we’ve gone through the initial stages of the digital workflow, let’s briefly discuss the production technologies.
This topic could fill an entire article (and we will have one dedicated exclusively to it), but here the idea is to provide a general overview to help in decision-making.
3D Printing
- Additive technique: Material is added layer by layer until the final shape is achieved.
- Generally works with resins (including some with ceramic fillers).
- Due to material limitations, it is mainly used to manufacture models, surgical guides, bruxism splints, and provisionals.
- The main advantage over milling is cost and geometric flexibility — it allows for pieces with more extreme angles and complex shapes.
Milling
- Subtractive technique: Material is removed from a block until the final result is achieved.
- Greater flexibility of materials: zirconia, disilicate, resins, composites, and even metals.
- Ideal for both long-lasting provisionals and definitive works.
- Its strong point is the variety of materials and aesthetic finish, generally superior to printing.
Is it worth having both?
In our experience, yes. For a truly complete digital workflow, ideally, you should have at least one 3D printer and one or more milling machines.
But why more than one milling machine? Unlike printers, milling machines tend to have more specific applications. Don’t worry, we will explain this in more depth in a full article on milling machines.
For now, to make evaluation easier, we consider three dedicated machines as a base:
- 1 milling machine for lithium disilicate
- 1 milling machine for zirconia and PMMA
- 1 milling machine for metals
Yes, there are hybrid models that process all these materials, but each choice has pros and cons, which we will also detail in a milling machine comparison.
Post-processing: material type and technology
To close the digital workflow, we move into post-processing — a stage that varies depending on the technology and, mainly, the type of material used.
For 3D printing:
It is essential to have two complementary devices:
- Washing unit: Removes resin residues after printing.
- Curing unit: Completes the process with UV light exposure, giving stability and strength to the pieces.
For milling:
The type of material requires specific care:
- Zirconia: This material is milled in its “green state” (chalk-like texture). After milling, it must go through a sintering furnace with controlled thermal cycles (varying by manufacturer) to achieve its final mechanical and aesthetic properties.
- Disilicate: This material undergoes a crystallization process in the same porcelain furnace used for makeup or layering.
Checklist: equipment for a complete digital workflow
Now that we’ve covered all the stages, here is the full list of equipment needed for those who want to operate a high-level digital workflow, including the main brands in each area.
1. Scanning stage (impression-taking)
- Intraoral or desktop scanner (mandatory): 3Shape, Sirona, MEDIT, Shining 3D, Straumann (AlliedStar), Runyes, Panda, Eighteeth, UP3D
- Facial scanner (optional): Instarisa, Shining 3D
- Photogrammetry (optional): PIC Dental, Imetric 4D, Shining 3D
2. Design stage (CAD)
- CAD software: Exocad, Blender for Dental, 3Shape, UP3D, Dental Wings
3. Production stage (CAM)
- CAM software: Many equipment manufacturers have their own software, but the most well-known are Millbox, Hyperdent, WorkNC
- 3D printers: HeyGears, Shining 3D, Phrozen, ASIGA, RapidShape (Straumann), Sirona, Flashforge, Formlabs, SprintRay
- Milling machines: Sirona, Amann Girrbach, Imes Icore, VHF, XT CERA, UP3D, UPCERA, AIDITE, REDON, DEPRAG, BSM, Yucera, Ivoclar
- For disilicate
- For zirconia and PMMA
- For metal
- For disilicate
4. Post-processing stage
- Washing and curing units for printers: Usually supplied by the same 3D printer brands.
- Sintering furnace (zirconia): Zubler, DEKEMA, Nabertherm, UPCERA, AIDITE, UP3D, Ivoclar
- Porcelain furnace (disilicate): Zubler, DEKEMA, Nabertherm, UPCERA, AIDITE, UP3D, Ivoclar
2. What are the workflow options, what can be done with each, and what is the client profile?
The digital workflow in dentistry can take on different configurations, from the most basic to the most complex, which require greater technical knowledge.
To make it easier to understand, we have organized some possibilities in increasing order of complexity, explaining what can be done in each and the most common user profile.
Scenario 1 – Intraoral scanner only
Ideal for small clinics that want to take their first steps into digital. In this model, scanning is done in-house and files are sent to a partner laboratory equipped to work with the digital dental workflow. It’s an accessible way to start without needing to invest in production equipment.
Scenario 2 – Intraoral scanner + CAD
Very common among small clinics and labs that want to perform all the aesthetic and functional planning digitally, while keeping production outsourced. The design of restorations and devices is done in-house with CAD software, improving communication with the lab that will do the final manufacturing.
Scenario 3 – Intraoral scanner + CAD/CAM + 3D printer
Possibly the most adopted model for those starting to invest in a complete digital dental workflow, but still with a controlled cost. Both clinics and labs choose this configuration, which allows for the production of models, guides, bite splints, provisionals, and even injected disilicate, which can be partially carried out within the digital workflow.
Option 4 – Intraoral scanner + CAD/CAM + printer + disilicate milling machine + porcelain furnace
A configuration widely used in chairside workflows, this option allows for the production of single crowns, veneers, and simple restorations in a short time. The main appeal is the speed of the process, especially with ceramic materials, offering excellent returns for clinics seeking productivity and in-house production control.
Option 5 – Intraoral scanner + CAD/CAM + printer + disilicate milling machine + zirconia (or hybrid) milling machine + porcelain and sintering furnaces
This is the typical configuration of digital labs already established in the market. It can handle everything from simple aesthetic cases (veneers, laminate veneers, anterior crowns) to more complex rehabilitations.
Option 6 – Intraoral scanner + CAD/CAM + printer + disilicate milling machine + zirconia milling machine + metal (or hybrid) milling machine + porcelain and sintering furnaces
This is the setup of large laboratories that operate with total flexibility within the digital dental workflow. It allows work with virtually all types of materials available on the market, without restrictions to certain case types or sizes.
3. What questions should you ask at the time of purchase?
Before investing in equipment for the digital dental workflow, it’s essential to answer some strategic questions. Let’s divide these considerations into two major groups, starting with the ones you should ask yourself:
Questions to ask yourself
- What do I need or want to digitize right now?
This is a key question that guides the entire plan. Some possibilities:
- I just want to offer scanning services to my patients → invest only in an intraoral scanner, no immediate need for CAD software.
- I want to focus on aesthetic and functional planning → a CAD software may be enough initially, especially if production is outsourced.
- I want to produce provisionals only → a 3D printer can meet this demand well, offering great cost-benefit.
- I want to work directly with zirconia → you’ll need to invest in a 5-axis (dry) milling machine, compatible CAM software, and a sintering furnace.
- I just want to offer scanning services to my patients → invest only in an intraoral scanner, no immediate need for CAD software.
- What amount am I willing to invest?
This may be the most relevant question of all. Your initial budget will define which technologies are feasible and whether you can set up a complete digital workflow from the start or will need to begin with a simpler setup and scale up gradually. - For which stages of the digital workflow am I already prepared, and where do I still need training?
Technical mastery of digital tools is as important as the equipment itself. Evaluating what you already master and where you need training will prevent frustration and ensure better clinical results with faster turnaround times.
Questions to ask vendors
Once you’ve reflected on your needs and goals for the digital workflow, it’s time to approach vendors with the right questions. Below, we focus on the intraoral scanner — one of the main entry points to the digital world.
Intraoral scanner questions
- What precision is needed for the intraoral scanner?
Common models range between 10 and 20 µm — excellent for single prostheses. For full arches, the stable and desirable value is under 50 µm.
Ideal criterion: Trueness ≤ 30 µm for single units; ≤ 50 µm for full arches. - What is the average scanning speed?
Manufacturers usually indicate that a full arch can be scanned in 1–2 minutes, which is optimal. However, since this varies by operator skill, test with a real patient.
Ideal criterion: Full arch ≤ 2 min with clinical practice. - Does the scanner require powder?
Most modern scanners don’t, which is more practical and avoids errors and extra steps.
Ideal criterion: No powder use. - Does the scanner have AI for artifact removal?
Leading products remove artifacts automatically, reducing rescans and improving efficiency.
Ideal criterion: AI with automatic soft-tissue segmentation. - Can the device capture subgingival images?
Typically yes, with proper operator technique. Fine tips can help.
Ideal criterion: Capture depth ≥ 1–2 mm subgingival with fidelity. - What is the depth of field (focus)?
Models vary from 10 to 20 mm; larger depth helps scan deep implant and scanbody areas.
Ideal: ≥ 15 mm, preferable for implant cases. - Is software included or purchased separately?
Most manufacturers offer an annual license; factor it into total cost of ownership.
Ideal: Lifetime license or updates included. - Is the scanner compatible with third-party CAD/CAM software?
Greater compatibility offers workflow flexibility.
Ideal: Compatible with at least two major platforms (Exocad, 3Shape). - In what formats are files exported?
STL is standard; PLY (with color) and OBJ are also common.
Ideal: Mandatory STL; optional PLY/OBJ. - Are there quality control tools in the software?
Most scanners offer mesh and cross-section analysis.
Ideal: Native visual and metric inspection tools. - What clinical applications are supported?
Check for modules dedicated to prosthetics, orthodontics, implants.
Ideal: Software with multi-application support. - How does bite (occlusion) scanning work?
Most capture in seconds; efficiency depends on alignment algorithms.
Ideal: Occlusion capture ≤ 30 sec with reliable alignment. - What is the scanner’s weight and ergonomics?
Commonly 250–350 g. Lighter and well-balanced scanners reduce operator fatigue.
Ideal: ≤ 350 g; test before purchase. - Is it wired or wireless?
Wireless offers mobility but may have autonomy/latency limits.
Ideal: Battery ≥ 1 hour continuous scan if wireless. - Minimum computer requirements?
At least 16 GB RAM, SSD, and dedicated GPU (NVIDIA GTX/RTX or equivalent).
Ideal: 16 GB RAM, SSD, compatible GPU. - Are scanner tips autoclavable? What’s the average durability?
Most last up to 150 autoclave cycles. Check included tips and replacement cost.
Ideal: ≥ 150 cycles durability. - What is the warranty?
Typically 1–3 years; check if it covers hardware and software.
Ideal: ≥ 2 years, extendable to 5. - Is technical support local?
Local and remote support is essential. Check response time and quality.
Ideal: ≤ 48 h response; initial training included. - Are updates and maintenance paid?
Usually free for the first year; afterward, there may be an annual fee.
Ideal: Free first year, clear renewal cost. - Is training included?
Many offer in-person or online training at installation.
Ideal: Live training + ongoing support resources. - What is the total cost including software and accessories?
Get an itemized breakdown (scanner, software, tips, warranty, support, training, renewals).
Ideal: 3-year total cost including all recurring expenses. - Is there published scientific evidence?
Check for independent clinical studies in indexed journals.
Ideal: ≥ 2 independent published studies. - Do clinics or universities already use this model?
If reputable institutions use it, that supports reliability.
Ideal: Presence in reference clinics/universities.
3D printer questions
- What printing technology does it use?
SLA, DLP, and LCD are most common. SLA = high precision; DLP = faster, good definition; LCD = more affordable.
Ideal: DLP or SLA for guides/provisionals; LCD fine for study models. - What is the XY resolution?
Lower values = better detail.
Ideal: ≤ 50 µm (preferably < 35 µm). - What is the minimum layer thickness?
Affects surface finish and detail.
Ideal: ≤ 50 µm (25–50 µm ideal for dental). - What is the average dimensional accuracy for dental models?
Critical for fit of guides/splints/provisionals.
Ideal: ± 50 µm or better. - How long to print a full arch?
Impacts clinic/lab productivity. Long print times can bottleneck production.
Ideal: less than 45 minutes per model. - What CAD/CAM software is the printer compatible with?
Compatibility with software such as Exocad, 3Shape, DentalCAD, and Meshmixer increases flexibility in the digital workflow. It is also important that it accepts widely used file formats.
Ideal: Compatibility with STL (mandatory), PLY and OBJ (optional). - Is the printer compatible with third-party resins (open system)?
Open systems allow the use of resins from various manufacturers, reducing costs and expanding clinical possibilities. Closed systems provide greater process control but are usually more expensive.
Ideal: Preferably open system. - Does the printer have certified biocompatible resins?
For clinical applications such as surgical guides, splints, denture bases, and provisionals, it is mandatory to use resins with recognized certifications (FDA, CE, or Anvisa). This ensures safety and compliance with health regulations.
Ideal: Class I or IIa resins certified by FDA, CE, and/or ANVISA. - What is the machine’s usable print volume?
The print size determines how many models can be produced simultaneously and whether there is enough space for applications such as full plates.
Ideal: Minimum 120 × 70 × 150 mm for efficient clinical use. - What features does the printer offer for daily use?
Functions such as auto-leveling, automatic calibration, and Wi-Fi connectivity make routine work easier and reduce process errors. These are important differentiators in high-production environments.
Ideal: Yes, with at least auto-leveling and basic connectivity. - Does the printer include post-processing equipment?
Curing and washing are mandatory steps to ensure the mechanical and biological properties of resins. Therefore, it is important to check whether the printer includes a curing unit and washer, or at least is compatible with external equipment.
Ideal: Yes (or compatible with quality external equipment). - What is the warranty period? Is there local technical support?
Having local technical support and a clear warranty is essential. 3D printers may require maintenance, and the support response time can directly affect workflow.
Ideal: Minimum one-year warranty and local or remote support with quick response. - Is training included in the purchase?
Efficient use of the printer depends on technical mastery of the equipment. Manufacturers that offer in-person or live online training facilitate the adoption of the equipment in the clinical or laboratory routine.
Ideal: Yes, with in-person or live online training included. - What is the average cost per print?
Knowing the resin cost per model is essential to calculate the operating cost per patient. Although it varies depending on the piece, it is important to request this estimate from the manufacturer for realistic financial planning. - Which components require frequent maintenance or replacement?
Trays, tanks, films, and filters are typical consumables. Ideally, they should be easy to source, quickly replaceable, and reasonably priced. Avoid models with complex maintenance or hard-to-find parts.
Ideal: Predictable costs and maintenance that does not require specialized tools. - Does the company offer regular firmware or software updates?
Updates show the company’s commitment to the product’s technological evolution. Continuous improvements in performance, interface, and compatibility are essential in a rapidly advancing sector.
Ideal: At least two updates per year. - Do other clinics successfully use this model?
Checking whether similar clinics or labs already use the model helps validate the choice. Request case studies, testimonials, or real clinical demonstrations. Practical evidence is a good reliability indicator.
Ideal: Yes. Request references and examples of practical use. - Do the printer and resins have recognized certifications?
For clinical use, it is essential that both the printer and resins have certifications such as Anvisa, CE, or FDA. This ensures compliance with health regulations and safety standards.
Ideal: Yes, with valid and internationally recognized certifications.